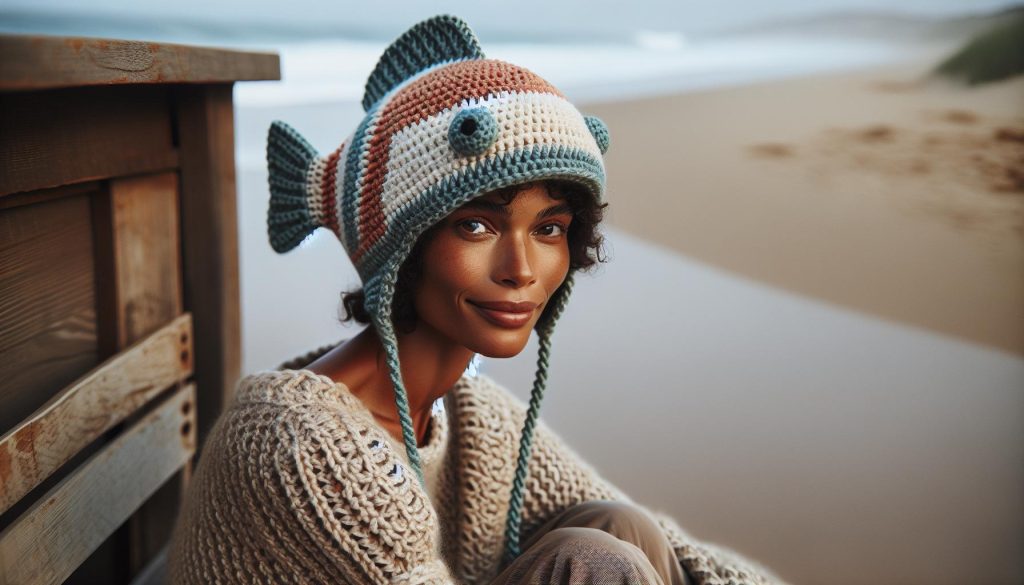
Dive into creativity with our Crochet Fish Hat Free Pattern: Under the Sea Fun! This enchanting project combines playful design with the joy of crafting, perfect for adding a splash of whimsy to any outfit or event. Whether you’re looking to delight a little one or add a unique piece to your wardrobe, this pattern is an excellent gateway for crafters of all skill levels.
Did you know that crochet can boost your mood and reduce stress? Engaging in this hands-on activity not only sharpens your skills but also fosters a sense of accomplishment as you watch your creation come to life. With easy-to-follow steps and friendly guidance, you’ll feel empowered to tackle this fun project, regardless of whether you’re a newbie or an experienced maker. Grab your yarn, and let’s make some magic happen under the sea! You can do this, and we’re here to cheer you on every step of the way!
Crochet Fish Hat: What You Need to Get Started
Creating your very own crochet fish hat is a fantastic project that not only brings a splash of fun but also hones your craft skills. Picture yourself or a loved one wearing a whimsical hat that captures the essence of the ocean! Before you dive in, let’s ensure you have everything you need to get started.
To craft this adorable accessory, you will require a few essential materials. First and foremost, choose your yarn – a medium-weight, brightly colored acrylic yarn is ideal for achieving that vibrant, underwater look. You’ll also need a crochet hook that matches your yarn type; typically, a size H (5.0 mm) works well for most medium-weight yarns. Other handy tools include a pair of scissors, a yarn needle for weaving in ends, and a measuring tape for sizing your hat accurately. Optional items like stitch markers can help prevent any mix-ups in your work.
Essential Materials List
- Yarn: Medium-weight (acrylic preferred)
- Hook: Size H (5.0 mm) crochet hook
- Scissors
- Yarn Needle: For finishing touches
- Measuring Tape: To ensure the right size
- Stitch Markers: Optional, for pattern clarity
The time invested in making your fish hat promises to be rewarding! Depending on your experience level, you can expect to spend a few hours on this project. Whether you’re a beginner or have some crochet experience under your belt, remember that every stitch brings you closer to showcasing your creativity. Keep a positive mindset and embrace the process-this is more than just a craft; it’s a journey of self-expression and joy! You can absolutely do this!
Essential Materials for Your Fish Hat
Creating your fish hat is not just an enjoyable craft; it’s a delightful way to showcase your creativity while tapping into your inner artist. To get started on this fun underwater project, you’ll need a few key materials that will make your crafting experience smooth and satisfying.
First up is your yarn! Opt for a medium-weight acrylic yarn in bright colors-think vibrant blues, sunny yellows, and striking oranges-that reflect the joyful spirit of the ocean. Acrylic yarn is fantastic because it’s easy to work with, washes well, and is available in a wide variety of colors. Next, grab a size H (5.0 mm) crochet hook; it’s perfect for this yarn type and will help you achieve the right tension for your stitches.
You won’t want to overlook other important tools like scissors for snipping yarn ends, a yarn needle for weaving in those pesky loose ends, and a measuring tape to ensure your hat fits just right. If you’re working with a complex pattern, consider using stitch markers. These handy little tools can help keep your place in the pattern, preventing any confusion as you work through your stitches.
Here’s a quick checklist to ensure you have everything you need:
- Yarn: Medium-weight acrylic in assorted colors
- Hook: Size H (5.0 mm)
- Scissors
- Yarn Needle: For finishing touches
- Measuring Tape: For sizing
- Stitch Markers: Optional but helpful
Every stitch will bring your whimsical fish hat closer to life, transforming simple materials into a vibrant piece of wearable art. Set aside a few hours, get comfortable, and remember that the process is just as rewarding as the final product. Dive in; you can do this!
Step-by-Step Crochet Instructions: Easy to Follow
Getting started on your fish hat is an exciting venture that combines creativity with practical skills. This fun project is perfect for all skill levels, even if you’re just starting your crochet journey. With a little patience and the right instructions, you’ll be amazed at how quickly you can create something whimsical and unique!
Begin by creating a slip knot and chaining a foundation of stitches to set the base of your hat. The general structure is simple: you’ll work in rounds to form a hat shape. Typically, you’ll start with a chain of about 60 stitches (adjust based on the size you’d like). Once your foundation is established, join with a slip stitch to form a circle, making sure to avoid twisting your chain.
Now, it’s time to dive into the delightful world of stitches! Switch to single crochet (SC) for the first couple of rounds, which provides a solid base. As you work, pay attention to your tension-it should be gentle but firm, allowing your stitches to hold together without being too tight. For each round, you can increase your stitches by adding a few extra SCs at intervals to give your hat a little flair and ensure it’s fitting snugly but comfortably around the head.
After you’ve established the main body of the hat, you can start to shape the fins and scales. To make fins, simply create small triangles using double crochet (DC) stitches, and attach them to the sides of your hat. Don’t hesitate to experiment with colors and stitch patterns; after all, this is your fish hat! Remember, the joy of crocheting lies in your creativity, so let your imagination swim free!
If you encounter any challenges along the way, don’t worry! Every maker runs into hurdles. Focus on enjoying the process, and remember: you can always unravel a few stitches to fix mistakes. Take your time, celebrate small wins, and before you know it, you’ll have a charming fish hat to wear or gift to someone special. Making something by hand is incredibly rewarding-you’ve got this!
Mastering the Fish Hat: Tips for Beginners
To craft the perfect fish hat, it’s all about patience and practice, especially if you’re a beginner. One of the most important tips is to start with the right materials. Opt for medium-weight yarn, as it’s easier to work with and gives your hat a nice structure. You’ll also want a crochet hook that matches your yarn choice-typically a size H (5.0 mm) works well for beginners. Having a good pair of scissors and a yarn needle on hand will help you finish off and weave in any loose ends, adding that perfect finishing touch.
Once you dive into the stitches, remember that tension is key. Keeping your stitches even will make your hat look more professional and help it hold its shape better. If you find your stitches are too tight, try to relax your grip on the yarn and hook. It’s okay to experiment with different techniques as you go; for instance, when creating fins, using double crochets can add a delightful texture. Don’t hesitate to make adjustments on the fly-crochet is all about creativity and personal expression!
It’s also helpful to break your hat down into manageable sections. Instead of trying to tackle the whole pattern in one go, focus on completing just a few rounds at a time. Set small goals: perhaps aim to finish a couple of rounds in one sitting, and celebrate those wins. And remember, mistakes are part of the journey! If you notice an error, simply unravel the stitches and try again. The beauty of crochet lies in its adjustability-your fish hat will come together beautifully, stitch by stitch.
Lastly, connect with fellow crafters! Whether through online forums or local groups, sharing your progress and asking questions can provide motivation and support. You might learn new techniques or receive encouragement that sparks your creativity. So gather your yarn, pick your colors, and let your imagination swim free while you master your fish hat!
Adding Creative Details: Customize Your Design
Crafting a fish hat opens up a world of creativity where your imagination can truly swim free! One of the most exciting aspects of crochet is the ability to customize your projects, making each piece uniquely yours. Adding creative details to your fish hat not only enhances its visual appeal but also allows you to express your personality and style.
To make your fish hat stand out, consider adding fun features like fins, scales, or even a whimsical tail. These elements can be created using simple stitches. For example, to crochet fins, use a combination of *double crochets* and *slip stitches* to create a textured look that resembles real fish fins. You might even experiment with fun yarns like sparkly or textured yarn to give your hat a unique flair. Don’t be afraid to mix colors! You can create a gradient effect for the body of the fish or use contrasting colors for the fins and features to create vibrant pops that catch the eye.
Another playful idea is to incorporate embellishments. Use small crochet flowers, beads, or buttons to mimic bubbles or shells, adding dimension and interest to your design. You can also utilize different stitches-like the *shell stitch*-to create scale-like patterns along the body of the fish hat. This not only brings visual richness but also gives you valuable practice with new techniques. Keep in mind, a fun crochet project isn’t just about how it looks; it can also be about the joy of experimenting with different textures, patterns, and colors.
Throughout the customization process, embrace the unexpected. The beauty of crochet is in its imperfections-each stitch tells a story. So, while you’re adding those adorable details, remember that your creativity is the limit. Trust yourself: you can definitely make this special fish hat yours!
Choosing the Right Yarn Colors for Under the Sea
When it comes to selecting yarn colors for your fish hat, think of the vibrant underwater world. Imagine the rich blues and greens of the ocean, complemented by the bright oranges, yellows, and purples of various fish. The beauty of this project lies not only in your crochet skills but also in the artistic choices you make.
Start by considering a color palette that resonates with the theme. Use a combination of warmer and cooler tones to create contrast. For example, you might choose a deep teal for the body of the fish and a splash of coral or yellow for the fins. This not only brings the hat to life but also adds dimension and depth. Here’s a quick guide to help you visualize your color combinations:
- Body Colors: Aqua, Turquoise, Coral, Deep Blue
- Accent Colors: Bright Yellow, Orange, Lavender, Hot Pink
- Fin and Tail Options: Pastels, Sparkly Yarns, Contrasting Bold Colors
Don’t hesitate to experiment! Yarn comes in various textures and finishes-some may have a shimmer that adds a touch of magic resembling light shimmering on water. Mixing textures can create the appearance of scales or fins. Using two or three complementary colors in easy-to-crochet patterns like stripes or spirals can evoke the playful spirit of the ocean. Also, consider gradient effects that transition beautifully from one color to another, mimicking the natural beauty found beneath the waves.
As you choose your yarn, envision your completed project. Gather swatches and lay them out next to your crochet hook and pattern; this tactile experience can ignite your creativity. Take a moment to reflect-how do these colors make you feel? Trust your instincts, because your personal touch is what will truly make this crochet fish hat an exciting and unique expression of your creative journey!
Troubleshooting Common Crochet Challenges
When diving into your crochet fish hat project, it’s normal to encounter a few bumps along the way. Remember, every stitch that doesn’t work out is just a step closer to mastering your craft! Let’s explore some common issues and how to troubleshoot them.
One of the most frequent challenges is dealing with uneven stitches. If your hat is looking lopsided or has inconsistent tension, it might be time for a little self-assessment. First, make sure you’re using the right yarn and hook sizes as indicated in your pattern. If you’re still struggling, try holding your yarn more consistently; how tightly or loosely you pull can significantly affect your stitch size. *Practice makes perfect!* Consider making a few swatches to get comfortable with your gauge before starting on the actual hat. You can always unravel a few rows if the tension varies too much; it’s part of the learning process!
Another challenge could be understanding the pattern instructions. Crochet patterns can sometimes feel like a different language! If you find yourself lost in the stitches or abbreviations, look for a helpful video tutorial to guide you. Websites like AllFreeCrochet offer a plethora of patterns and visuals that can clarify tricky stitches. If it helps, jot down key points or stitch counts as you go to keep track of your progress and spot mistakes early.
Lastly, if you notice your fish hat doesn’t have the intended shape or dimensions, check if you’re following the pattern closely regarding the number of stitches and rounds. Each stitch matters-going off pattern by just a few stitches can drastically change the final look! If you feel it’s a bit too tight or loose, adjusting your hook size can also make a big difference, giving your hat a much better fit.
Don’t forget, keep your crochet experience fun! Each little mistake is an opportunity to learn and grow as a crafter. So take a deep breath, enjoy the process, and *you got this*! Happy crocheting!
Exploring Fun Variations of the Fish Hat
Creating variations of your fish hat can be an exciting way to unleash your creativity and personalize your project! From subtle adjustments to bold transformations, there are plenty of fun modifications you can experiment with as you crochet. Not only do these variations allow you to showcase your individual style, but they also provide opportunities to develop new skills in your crafting journey.
One easy way to change up the look of your fish hat is to experiment with different textures. Consider using a combination of yarn types, such as soft cotton for the main body and fluffy, textured yarn for the fins or gills. This adds a delightful contrast and enhances the visual interest of your hat. You can also play with stitch patterns; instead of the standard single crochet, try using half double crochet or front post double crochet in certain sections to create fun ridge patterns or waves that mimic the ocean’s movement.
Another exciting approach is to play with colors! You don’t have to stick to traditional fish hues-make your hat pop with bright pinks, purples, and blues, or go for a more whimsical design with rainbow stripes. You can even integrate a variegated yarn for a unique, multicolored effect. To make your fish hat even more playful, consider adding embellishments like crochet bubbles or fish eyes made from safety eyes or buttons. These small details can transform your basic design into something extraordinary.
Finally, don’t shy away from exploring themed adaptations. Find inspiration from various sea creatures! How about creating a pufferfish-inspired hat with spiky fins or a mermaid version adorned with scales? Each iteration could be a fun new project to tackle. Embrace your inner designer and remember that every variation is an opportunity to learn and grow. Enjoy experimenting-your creativity is the only limit! Happy crocheting!
Inspiring Crochet Projects: Beyond the Fish Hat
Creating something unique can be one of the most rewarding experiences in crochet. Once you master the fish hat, you’re ready to dive into a sea of delightful projects that lend themselves to your newfound skills. Expanding your creative repertoire can lead to endless possibilities, whether you’re looking to make gifts, decorations, or wearables.
Sea Creature Companions
Why not create a whole underwater ensemble to go with your fish hat? Imagine a matching crochet octopus or a sweet seahorse companion! These projects can be simple enough for beginners and will allow you to practice your shaping and stitching techniques in a fun and playful way. For instance, an octopus can be made by starting with a round body and adding strands of yarn for tentacles, while the seahorse can provide an opportunity to explore intricate stitches as you create its tail and fins.
Ocean-Themed Accessories
Once you’ve had your fun with sea creatures, consider branching out into accessories that echo the beauty of the ocean. A crochet beach bag, for instance, can be a perfect summer project! You can use bright colors reminiscent of coral reefs or deep-sea hues. This bag not only showcases your crochet skills but also combines utility with creativity. Start with a sturdy stitch for the base, and explore different patterns for the sides. You can even add little fish or starfish appliques for extra flair!
Creative Home Décor
Don’t forget about sprucing up your home with your crochet skills! Nautical-inspired coasters, table runners, or wall hangings can bring the ocean’s charm to your living space. Try making coasters shaped like seashells or starfish-perfect for summer gatherings. This project involves simpler stitches and offers a great opportunity to play with color and texture, allowing you to really express your style.
Each of these projects not only enhances your crochet skills but also allows you to express your creativity and passion. Remember, whether you’re crafting a whimsical octopus, a chic beach bag, or charming home décor, the most important part is to enjoy the process. You can do this! Embrace your creativity, and let the sea of crochet inspire you to create even more wonderful things!
Showcase Your Work: Share Your Crochet Journey
Sharing your crochet projects is one of the most rewarding parts of being a crafter. Whether it’s your delightful fish hat or another whimsical creation, showcasing your work allows you to celebrate your progress and connect with others who share your passion. You might be surprised to learn that many crafters experience a boost in creativity and motivation when they share their creations-it’s that sense of community that makes crafting even more enjoyable!
One great way to share your crochet journey is through social media platforms like Instagram, Facebook, or Pinterest. Create a dedicated space on these platforms where you can post pictures of your finished projects, from every angle, showcasing the intricate details and vibrant colors of your fish hat. Use popular hashtags such as #CrochetFishHat or #UnderTheSeaCrochet to reach a broader audience and inspire fellow crocheters! Don’t forget to engage with potential followers by commenting on their projects and sharing tips to foster connections.
Consider joining online crochet communities or local crafting groups where you can share your projects in real-time. Platforms like Ravelry or crochet-specific forums are perfect for connecting with other enthusiasts who can offer support and encouragement. Hosting or participating in “show and tell” sessions at craft fairs or community centers can also bring a personal touch to your sharing experience. Remember, feedback from peers can help you grow as a crafter, and you might even pick up new techniques along the way.
Sharing your crochet journey is not just about showing off your amazing skills; it’s also about inspiring others to pick up a hook and start creating. Whether you find joy in your own progress or delight in the enthusiasm of others, you’ll find that the community aspect of crochet creates a vibrant fabric of creativity and friendship. So, gather your projects, capture those beautiful moments, and show the world your unique crochet journey-you’ve got this!
Join the Crochet Community: Tips for Networking
Connecting with fellow crocheters can be one of the most enriching aspects of your crochet journey, especially when creating whimsical projects like a fish hat. The crochet community is vast and welcoming, making it easy for anyone to dive in, regardless of skill level. Whether you’re new to crocheting or a seasoned maker, finding your tribe can not only boost your confidence but also inspire new creative ideas.
To start networking, consider engaging on social media platforms where crafters gather. Instagram is a treasure trove for crochet enthusiasts. Use hashtags like #CrochetFishHat or #UnderTheSeaCrochet to link your projects with others. Follow crochet artists and interact with their posts by leaving comments or sharing your thoughts. This not only opens doors to new friends but also exposes you to diverse styles and techniques you can incorporate into your work. Pinterest is another great platform where you can create boards showcasing your completed projects and those that inspire you.
Joining Online Communities
Don’t overlook dedicated online forums and websites. Ravelry is a fantastic resource where crocheters share patterns, tips, and experiences. You can join groups focused on specific projects or themes-like under-the-sea creations-where you can share your fish hat and gather feedback. Participating in discussions and forums will enhance your skills and motivate you to take on new challenges.
Local Connections
Local crafting groups or meetups are another way to expand your network. Look for groups at community centers or libraries where you can share your creations like the fish hat or any new projects you’re working on. Many areas have crafting clubs that meet regularly to crochet together, providing a wonderful environment to learn from one another and build friendships. You could even host your own crafting session at a nearby café or home, inviting others to bring their projects and share their crafting stories.
Networking isn’t just about sharing what you’ve made; it’s about celebrating each other’s creativity and encouraging one another to grow. You can do this, and with every connection you make, you’ll not only become part of a vibrant community but also enrich your own crafting experience.
Frequently asked questions
Q: What types of yarn are best for a crochet fish hat?
A: Acrylic and cotton yarns are ideal for a crochet fish hat because they offer durability and a soft texture. Choose vibrant colors to mimic fish hues! For a brighter and more playful look, consider yarns with fun patterns or sparkles. You can find yarn recommendations in the “Choosing the Right Yarn Colors for Under the Sea” section of your project guide.
Q: How long does it take to crochet a fish hat?
A: Crocheting a fish hat typically takes 2 to 4 hours, depending on your skill level and the complexity of your design. Beginners may take longer as they familiarize themselves with new stitches. Make sure to set aside time for practice and enjoy the process!
Q: Can I use a different hook size for the fish hat pattern?
A: Yes, you can use a different hook size, but keep in mind that it may alter the finished size of the hat. A larger hook creates a looser fabric, while a smaller hook will yield a tighter fit. Check the “Essential Materials for Your Fish Hat” section for recommended sizes.
Q: Are there any common mistakes to avoid when crocheting a fish hat?
A: Common mistakes include not counting stitches accurately and skipping rows in the pattern. Take your time to double-check your work as you go. You can find helpful tips in the “Mastering the Fish Hat: Tips for Beginners” section for a smoother crocheting experience.
Q: How can I customize the design of my crochet fish hat?
A: You can customize your crochet fish hat by adding unique embellishments like sequins, eyes, or fins. Experiment with different color combinations for the body of the fish and even consider adding personalized labels. Refer to “Adding Creative Details: Customize Your Design” for inspiration!
Q: Where can I find more free crochet patterns like the fish hat?
A: You can discover more free crochet patterns by visiting dedicated craft websites such as Crochet.com or checking out tutorials on DMC. Explore these resources for new and exciting projects!
Q: What skill level is required to crochet a fish hat?
A: The crochet fish hat is generally suitable for beginner to intermediate crafters. Basic stitches like single crochet and double crochet are used. If you’re new to crochet, follow the “How to Crochet for Beginners: A Complete Guide” for foundational skills to support your project.
Q: What are the best occasions to wear a crochet fish hat?
A: A crochet fish hat is perfect for themed parties, beach outings, or costume events. It’s also a fun accessory for children during playtime or for anyone looking to add a quirky touch to their outfit. Celebrate your creativity by wearing your creation proudly!
In Retrospect
Congratulations on completing your Crochet Fish Hat! This fun project is perfect for crafters of all skill levels, and we’ve made it easy for you to create something as delightful as it is practical. If you enjoyed making this hat, don’t miss out on our other fun crochet patterns, like the adorable Crochet Octopus Hat or the charming Crochet Sea Turtle Blanket, available in our free pattern library.
Ready for your next project? Join our newsletter for the latest crochet tips, exclusive patterns, and community support that will keep you inspired! And remember, if you have any questions, drop a comment below-your fellow crafters would love to hear from you. Keep exploring the world of crochet, and watch as your skills grow! Happy crocheting!


