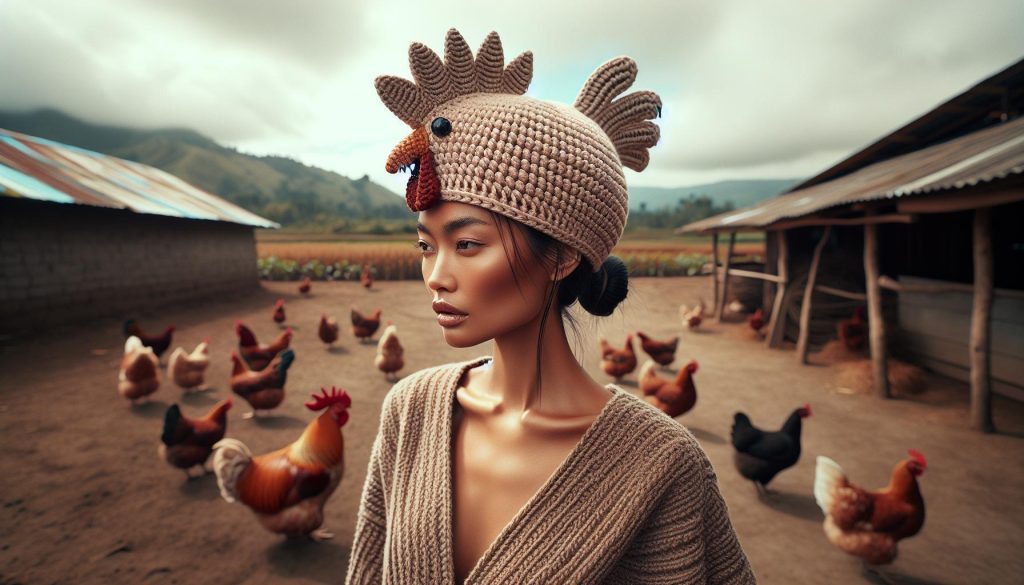
Have you ever wanted to add a dash of whimsy to your wardrobe or surprise a friend with a quirky gift? Crocheting a chicken hat is the perfect project that combines creativity and fun! This delightful farm animal costume not only brings smiles but also showcases your crafty skills. With just a few basic materials and stitches, you can create an eye-catching hat complete with a fluffy comb. Whether you’re preparing for a themed party, dressing up for Halloween, or simply looking to brighten someone’s day, this fun project is accessible for all skill levels. So grab your crochet hook, and let’s dive into the colorful world of chicken hats! You can do this, and I’m here to guide you every step of the way. Ready to get started? Let’s go!
How to Choose the Best Yarn for Your Chicken Hat
Choosing the right yarn for your chicken hat is essential to ensure it turns out both charming and comfortable. You’ll want a type of yarn that is soft against the skin, especially if you plan to wear your hat for extended periods. For this delightful project, consider using a yarn that offers both warmth and a fluffy appearance-perfect for mimicking a feathery look. Popular options include acrylic or a wool-acrylic blend, which not only provides warmth but is also easy to care for.
When selecting colors, let your creativity shine! Traditional chicken colors like vibrant yellows, whites, or even playful speckles can add personality to your hat. Look for yarns with a soft texture and good stitch definition to keep your chicken hat looking sharp. A bulky or super bulky yarn will work well to create a quick and cozy finish, reducing your crafting time while making the hat sturdier and more structured.
As you shop for yarn, keep an eye on the yarn weight-most chicken hat patterns will suggest a specific gauge. If you’re unsure, a medium (worsted) weight yarn is a safe choice that balances ease of handling and richness of color. Don’t hesitate to check out local craft stores or online retailers like Michaels for a broad selection of yarn options, which can help you find just the right material and color for your creative vision. Remember, the perfect yarn can make your chicken hat not just a pattern, but a delightful headpiece you’ll treasure for any occasion!
Essential Crochet Tools You’ll Need

Getting started on your chicken hat means equipping yourself with the right tools! Having the essentials at your fingertips not only makes the crocheting process smoother but also adds joy to your crafting experience. Here’s a quick guide to the must-have tools that will help you bring this fun project to life!
First up, you’ll need a good crochet hook. For a chicken hat, a size H (5.0 mm) or I (5.5 mm) hook usually works well, especially if you’re using worsted weight yarn. A comfortable grip can make a world of difference, so consider ergonomic hooks if you’re planning on crafting for a while. Don’t forget a pair of scissors and a yarn needle-these are essential for trimming and weaving in ends so your hat looks neat and polished!
Another great addition to your toolkit is a stitch marker. This handy little item will help you keep track of your stitches and rows, especially when you’re working in the round. You can also use a measuring tape to ensure your hat is the perfect size. If you’re feeling crafty, you can even make your own stitch markers with beads and a safety pin!
Finally, consider a yarn bowl or a yarn holder for managing your yarn. It keeps your working yarn from tangling and makes the process more enjoyable. Plus, it adds a cute touch to your workspace! With these tools, you’re ready to tackle the chicken hat project. Remember, every crochet stitch you make is a step closer to a delightful creation you can wear with pride. You can do this!
Beginner-Friendly Crochet Stitches to Master

Learning a few fundamental crochet stitches can elevate your chicken hat project from good to delightful! Embracing these beginner-friendly techniques not only makes the crafting process more enjoyable but also boosts your confidence as a maker. Let’s dive into some essential stitches that will bring your whimsical hat to life.
First, you’ll want to master the chain stitch (ch), which is the foundation for almost every crochet project. To create a chain stitch, simply yarn over and pull through the loop on your hook. This stitch will help you establish the base for your crochet rows. Next, practice the single crochet (sc), which is perfect for thickening your hat. Insert your hook into the designated stitch, yarn over to pull up a loop, yarn over again, and pull through both loops on the hook. It’s a straightforward stitch that builds a solid fabric-ideal for keeping your head warm!
Another key stitch is the double crochet (dc). Even though it’s higher than single crochet, it’s simple to learn! Yarn over, insert your hook into the stitch, yarn over again, pull through, yarn over to get through the first two loops, and yarn over once more to finish through the remaining two loops. Mastering these stitches provides you with the toolkit you need to complete the main body of your chicken hat, along with any unique features like the wings or comb.
Adding Fun Details
As you become comfortable with these stitches, consider how they can add character to your creation. You might want to enhance your chicken hat with fun textures or colors using techniques like the slip stitch (sl st) for joining rounds without adding height, which is useful for the comb, or the front post double crochet (fpdc) to create exciting raised designs along the hat’s body.
With your yarn and crochet hook in hand, remember that every stitch is a step towards your colorful, feathered masterpiece. You can tackle this project-every beginner starts somewhere, and you’re well on your way to creating a charming chicken hat to wear with pride! You can do this!
Step-by-Step Guide to Crocheting the Chicken Body

Creating the body of your chicken hat is an exciting step that bridges simplicity with playful creativity! This section will guide you through the process of crocheting the main portion of your hat, transforming yarn into a charming chicken design that is perfect for dress-up or cozy wear.
To start crafting the chicken body, gather your materials: a soft, yellow yarn for the main part, a crochet hook (preferably size H/8 or 5 mm for beginners), and a pair of scissors. This project is relatively easy and can typically be completed within 2-3 hours, depending on your crochet speed. Let’s get to the fun part!
Step-by-Step Instructions
- Create a Slip Knot and Foundation Chain: Begin by making a slip knot on your hook and chaining about 5-10 stitches (this will depend on your desired size). The foundation chain will determine the circumference of the hat, so adjust accordingly.
- Make a Ring: Join the last chain to the first with a slip stitch to form a ring. This is the start of your crochet round and keeps everything nice and circular.
- Crochet the First Round: In the ring, work 10-12 single crochets (sc). This foundational row is where your chicken body begins to take shape! Make sure to pull the tail of your yarn to close the center ring snugly.
- Increase Rounds: For subsequent rounds, continue to increase your stitches. For example, in the second round, crochet 2 single crochets in each stitch around (totaling 20-24 stitches). Keep repeating this process of increasing until you reach the desired width, usually around 4-6 rounds of increases.
- Build the Body: After reaching the desired width, continue crocheting in the round without increasing for about 4-6 rounds. This will create the height of the chicken body. Remember to count your stitches to maintain an even shape!
- Finish the Body: Once you reach your desired height, cut the yarn, leaving a long tail for sewing (about 6 inches). Pull the tail through the last loop to secure it.
Tips for Your Chicken Body
- Color Variations: If you want to add variations to your chicken’s body, consider using multiple shades of yellow or adding some orange for depth.
- Testing Fit: As you work, periodically try the hat on to check for fit and make adjustments if needed. This ensures it’ll be comfy and cute.
- Celebrate Your Progress: Keep reminding yourself, “You can do this!” Every stitch brings your whimsical chicken hat closer to reality.
By following these steps, you’ll create a solid body for your chicken hat that not only looks adorable but also feels great to wear. Once you master this, you can personalize your design with unique features like wings, eyes, and a comb! Happy crocheting!
Crafting a Colorful Comb for Your Hat
Crafting the comb for your chicken hat adds that whimsical touch that truly brings your project to life! This colorful feature is not only fun to make, but it also enhances the overall charm of your design. You’ll want to choose bright, contrasting colors to make your comb pop against the yellow of the chicken body. Think vibrant reds, oranges, or even shades of purple for a playful twist! This part of the project is beginner-friendly and can typically be completed in under an hour.
To start, gather your materials: you’ll need a couple of shades of yarn (for example, bright red and orange), a crochet hook (you can stick with the same size used for the body), and scissors. The comb is crocheted separately before being sewn onto the hat.
Step-by-Step Instructions
- Chain Stitches: Begin by making a chain of about 10-15 stitches. This length can vary depending on how large you want your comb to protrude. You want it to be visible and striking!
- Begin the Rows: Turn your work and crochet back along the chain. For added texture, alternate between single crochet (sc) and double crochet (dc) stitches. For example, start with 1 sc, then 1 dc, and repeat until you reach the end of the chain.
- Creating the Points: In the next row, you can create the traditional comb shape. For this, chain 3 and then slip stitch back into the last stitch. Continue this process along the edge to form pointed tips of the comb, giving it that signature look. Make about 3-4 points depending on your preference.
- Finish Up: Once completed, cut the yarn and pull it through the last loop to secure it. Leave a tail for sewing the comb onto the hat later.
To attach the comb, simply position it atop the hat and use a yarn needle to sew it securely in place. Don’t stress about it being perfect-embrace those little imperfections that showcase your unique style! And remember, this is your creation-celebrate the process!
Adding a colorful comb is not just a fun project; it makes your chicken hat truly stand out. Each comb can reflect your personality or style, so feel free to experiment with colors and variations. Keep crafting, enjoy the journey, and most importantly, have fun wearing your delightful chicken hat! You can do this!
Adding Fun Features: Eyes and Beak Ideas

Bringing your chicken hat to life goes beyond just the colorful comb; the eyes and beak are essential elements that add personality and charm. A well-crafted face gives your hat a fun, whimsical appeal that’s sure to delight. Plus, these features can easily be tailored to reflect your own creative style-be it silly, realistic, or completely cartoonish!
To get started, gather your materials: you’ll need some yarn in colors like yellow for the face, orange for the beak, and black for the eyes. Depending on your design preference, you might also consider using safety eyes or felt circles for a quick option. This part of the project is beginner-friendly and should take about an hour or so to complete.
Creating the Eyes
There are various methods for making the eyes that can suit any skill level. Here’s a simple way to crochet adorable eyes:
- Magic Circle: Start with a magic circle; this will be the base of your eye.
- First Round: Work 6 single crochets (sc) into the magic circle. Pull tight to close the circle.
- Second Round: Increase in every stitch (12 stitches total).
- Color Change: If you want to add eyelids or a background color, change yarn and continue crocheting for another couple of rounds using a different color, increasing as necessary for size.
You can create eyelids just by adding a small row above the completed eye. Lastly, sew or glue on a small black circle for the pupil to complete the look!
Making the Beak
The beak is another quick feature to whip up. Start by making a small triangle shape:
- Chain: Start with a chain of 5.
- First Row: Turn and crochet into the second chain from the hook-do a single crochet (sc) in the next 3 chains, then chain 1 and turn.
- Decreasing: For the next row, work a sc in the first stitch, skip the next, and then sc in the last stitch.
- Finish Off: Finally, stitch across the last row to close the triangle shape.
Sew the beak onto the front of your chicken hat, ensuring it’s centered beneath the eyes for a balanced look.
By adding these playful features, you create a chicken hat that isn’t just a costume but a vibrant part of your creative expression. Don’t shy away from experimenting with eye shapes or beak sizes-each choice makes your hat uniquely yours. Remember, you can do this! The joy is in the making, so let your imagination take flight!
Tips for Size Adjustment: Making It Fit Perfectly
Getting the perfect fit for your chicken hat is a fun challenge, and with a few handy tips, you’ll ensure your creation sits snugly on your head or the head of your lucky recipient! Whether you’re making this hat for yourself, a child, or even as a gift, incorporating size adjustments early in your project makes the whole experience more enjoyable.
Start by measuring the head circumference where the hat will sit. To get an accurate measurement, use a flexible measuring tape and wrap it around the widest part of the head, usually just above the ears and across the forehead. Once you have this measurement, you can adjust your stitches accordingly. If you’re using a standard crochet pattern, most patterns are designed for average adult or child sizes. However, don’t hesitate to modify the starting chain or add extra rows to accommodate larger heads.
Adjusting Your Pattern
If the pattern instructions are unclear or you’re making adjustments on the fly, here’s a simple method for ensuring a better fit:
- Increase Stitches: If your measurement indicates a need for more room, you can add stitches to your starting chain. A good rule of thumb is to add about 5-10 extra single crochet stitches for a comfortable fit.
- Check Your Gauge: Before diving in, check the gauge of your yarn and hook combination by crocheting a swatch. This will help you gauge how many stitches and rows you need to achieve the desired size.
- Try It On: If possible, periodically try the hat on as you crochet. This hands-on approach helps you visualize any adjustments you might need as you progress.
Finishing Touches
When you near the end of your project, consider adding a stretchy band or an adjustable strap, especially for kids’ hats that may need to last a few growing years. A simple elastic band can be sewn into the bottom of the hat to provide a snug fit without sacrificing comfort. Alternatively, add a tie or some fun buttons to personalize the hat while keeping it adjustable.
Remember, crafting is all about experimenting and having fun. If you make a mistake, embrace it! You can unravel and redo or incorporate those quirks into a unique feature of your design. With these tips, you’ll be well on your way to creating a chicken hat that fits perfectly and showcases your creative flair. You can do this-let your creativity soar!
Finishing Touches: Weaving in Ends and Blocking
Every crochet project deserves a polished finish, and your chicken hat is no exception! Once you’ve completed the fun process of crafting, it’s essential to tackle those pesky yarn ends and ensure your piece looks its best. Weaving in ends and blocking are crucial steps that elevate your work, giving it that professional touch.
To weave in the ends, you’ll first want to gather a yarn needle and a pair of sharp scissors. Take the tail of each yarn piece and thread it through the needle. Insert the needle into the stitches near the end of the yarn, ideally from back to front, ensuring you are going through the fabric and not just the top layer. A good practice is to weave the yarn end in about 1-2 inches (2.5 to 5 cm) into your work, following the same stitch path. This secures the end and prevents it from unraveling over time. If you feel adventurous, split the yarn fibers slightly and weave the tail into the body of your hat at different angles. Once you’re confident it’s secure, trim the excess, making sure not to cut too close to the fabric.
Next up is the exciting step of blocking. This technique shapes your crochet work and sets the stitches in place, especially important for maintaining the hat’s structure. To block your chicken hat, begin by gently washing it in cold water with a mild detergent, which helps eliminate any dirt or oils. Once washed, lay your hat flat on a clean towel to dry, reshaping it gently to its intended form; the comb and features may require a bit more attention here to maintain their vibrant character. You can also use pins to secure the hat’s edges on a blocking board or another flat surface, making sure it’s evenly positioned. Blocking not only smooths out stitches but also enhances the overall appearance of your hat, ensuring it’s showcase-ready!
With these finishing touches completed, your chicken hat will not only fit perfectly but look fabulous too. Remember, every little detail counts, and with a few simple steps, your crafted piece can truly shine. Enjoy the process, and don’t hesitate to show off your beautifully finished creation!
Ideas for Unique Farm Animal Costumes
When planning your next creative project, why not take a whimsical turn into the farmyard with unique animal costumes? Crocheting a chicken hat can be a fantastic starting point, but let’s expand the fun and think about how to crochet other farm animals that can complement your chicken hat or stand alone!
Imagine coordinating a full farmyard ensemble that can be perfect for playdates, costume parties, or even themed events. Here are some delightful ideas:
- Cow Hat: A classic black-and-white spotted cow hat can really bring your farm costume to life. Use a soft yarn to ensure comfort, and consider adding little ears and a small tail for extra flair!
- Pig Ears Headband: Create a simple headband with crochet pig ears to pair perfectly with a pink shirt. It’s an easy and quick project that even beginners can take on.
- Sheep Beanie: Make a fluffy sheep beanie using a textured yarn for that woolly effect. Use black yarn for the face and ears, and don’t forget to add a cute little bell for that finishing touch!
- Duck Bill Beanie: Craft a bright yellow duck beanie with an oversized beak. This project is fantastic for using leftover yarn and brings a splash of color to your costume collection!
With a little creativity, you can even mix and match elements from different farm animals. For example, combine the chicken’s comb with pig ears for a fun hybrid costume that is sure to turn heads and tickle imaginations. Don’t hesitate to experiment with textures and bright colors to make your creations unique!
These projects are not only enjoyable but can enhance storytelling and playfulness for kids and adults alike. Whether it’s for a school production, Halloween, or just some fun with friends, dive into these projects knowing that you can make your farm animal costume as simple or as intricate as you like. So grab your yarn, gather your tools, and let your creativity run wild in the fields of crochet! You can absolutely do this!
Event Inspiration: When to Wear Your Chicken Hat
Crafting your own chicken hat isn’t just about the joy of crocheting; it’s also about finding the perfect time to wear this whimsical creation! Whether you’re planning a playful outing or joining a festive occasion, your chicken hat can add an extra layer of fun and creativity to your ensemble. Here are some delightful opportunities where sporting your cheerful chicken hat will be a hit.
One of the best occasions for rocking your chicken hat is at costume parties. These gatherings offer a fantastic chance to showcase your creativity and the skill you’ve put into making your hat. Imagine arriving at a party and being greeted with smiles and laughter as you waddle in with your adorable creation. Not only will you stand out, but you’ll surely spark conversations and inspire others to think outside the box when it comes to their costumes.
Special Events and Holidays
Another great time to wear your chicken hat is during holiday celebrations. Halloween is an obvious choice, where your character will fit right in among all the other fun costumes. Additionally, don’t overlook Easter! The playful, farm-themed aesthetic of your chicken hat can enhance any springtime egg hunt or community event. Picture yourself at a picnic or a spring fair, brightening the day for kids and adults alike with your festive flair.
Family Gatherings and Playdates
Family gatherings or playdates are also prime opportunities for your chicken hat. Children love imaginative play, and a chicken hat can set the tone for a fun-filled day. Organize a mini barnyard theme for your next gathering and encourage little ones to join in by making their own farm animal hats. You can even plan fun games or storytelling sessions centered around farm animals, enhancing the playful atmosphere.
Always remember, the most important part of wearing your chicken hat is to have fun! Whether you’re making others smile at a party or bringing joy to family events, each moment spent in your creative hat will be a memorable one. So, wear it with pride and make every occasion a little more colorful! You can absolutely do this!
Showcase Your Finished Chicken Hat: Share Your Creations
Showing off your finished chicken hat can be as joyful as creating it! There’s an undeniable thrill in sharing your creative accomplishments with others, and what better way to spread some cheer than by showcasing your whimsical creation? Whether it’s at a craft group, on social media, or even at a festive event, sharing your chicken hat can inspire others and build a sense of community around crafting.
One great idea is to host a mini photo shoot featuring your chicken hat. Find a lively backdrop, perhaps in a park or among bright spring flowers, and take some fun photos! This can create beautiful memories and give you great material to share online. Consider posting on platforms like Instagram or Pinterest, where you can connect with fellow crafters. Don’t forget to use hashtags like #CrochetChickenHat or #CrochetCostume to make your posts discoverable. You could even create a specific hashtag for your chicken hat project, making it easy for friends and fellow crafters to find and join in the fun.
If you’re part of a crafting community, why not organize a “Show and Tell” session? Invite others to bring their projects to share while you proudly display your chicken hat. This can foster an encouraging atmosphere, where everyone feels inspired to try new designs and techniques. You might find others are interested in a fun crochet-along or sharing patterns to create more quirky hats together! Remember, the joy of creating isn’t just in the act-it’s also about connecting with others who share your passion. So, grab your camera, show off that fabulous chicken hat, and let the world see your creativity in action!
Frequently asked questions
Q: What materials do I need to crochet a chicken hat?
A: To crochet a chicken hat, you’ll need yarn in yellow, red, and black, a crochet hook suitable for your yarn weight, scissors, and a yarn needle for weaving in ends. Refer to the “How to Choose the Best Yarn for Your Chicken Hat” section for more details.
Q: How do I size my chicken hat for different ages?
A: To adjust the size of your chicken hat, measure the head circumference of the wearer and compare it to standard sizing charts. You can modify the number of stitches or rows to achieve the perfect fit. Check the “Tips for Size Adjustment” section for more guidance.
Q: What beginner-friendly crochet stitches should I use for a chicken hat?
A: For a chicken hat, basic stitches like single crochet and double crochet are ideal. These stitches help create a stable structure. Explore detailed instructions in the “Beginner-Friendly Crochet Stitches to Master” section for effective techniques.
Q: How long does it take to crochet a chicken hat?
A: The time required to crochet a chicken hat varies by skill level. Beginners might take 3-5 hours, while experienced crocheters could finish in 1-3 hours. Planning your time effectively can help you enjoy the process!
Q: Can I customize my chicken hat with other designs?
A: Absolutely! Get creative by adding unique elements like bows, colorful feathers, or even other barnyard animal features. The “Ideas for Unique Farm Animal Costumes” section offers inspiration for personalizing your hat.
Q: What is the best way to block my chicken hat after crocheting?
A: To block your chicken hat, gently steam it using a steam iron or spray bottle and pin it to a flat surface. This will help shape the hat and give it a polished look. Consult the “Finishing Touches” section for detailed blocking techniques.
Q: Where can I find patterns for different chicken hat variations?
A: You can discover various chicken hat patterns on crafting websites like LoveCrafts, which features thousands of free crochet patterns. Look for patterns tailored to your style and skill level within the vast collection available online.
Q: What events are great for wearing a chicken hat?
A: Chicken hats are perfect for Halloween, barn-themed parties, or costume contests. They can also add fun to agricultural fairs or family gatherings. See the “Event Inspiration: When to Wear Your Chicken Hat” section for more ideas on where to showcase your creation.
Final Thoughts
Congratulations on making your very own Chicken Hat! This fun and lively project is perfect for all skill levels, letting you showcase your crochet talents while delighting friends and family with your unique creation. Whether you plan to wear it for a costume party, as a playful accessory for a child, or simply for a good laugh, this hat is sure to turn heads.
Don’t stop here-why not explore more crochet patterns? Check out our free collection of adorable designs, from cozy scarves to charming baby blankets. If you’re looking for more tips and tricks, you won’t want to miss our ‘How to Crochet for Beginners’ guide, which is packed with helpful insights and tutorials to boost your skills even further. Join our community by signing up for our newsletter, where you’ll receive the latest patterns and exclusive content straight to your inbox.
Now, grab those hooks and keep crocheting! We’d love to hear about your experiences-share your projects in the comments below or connect with us on social media. Every stitch brings us closer together, and we can’t wait to see what you create next!


