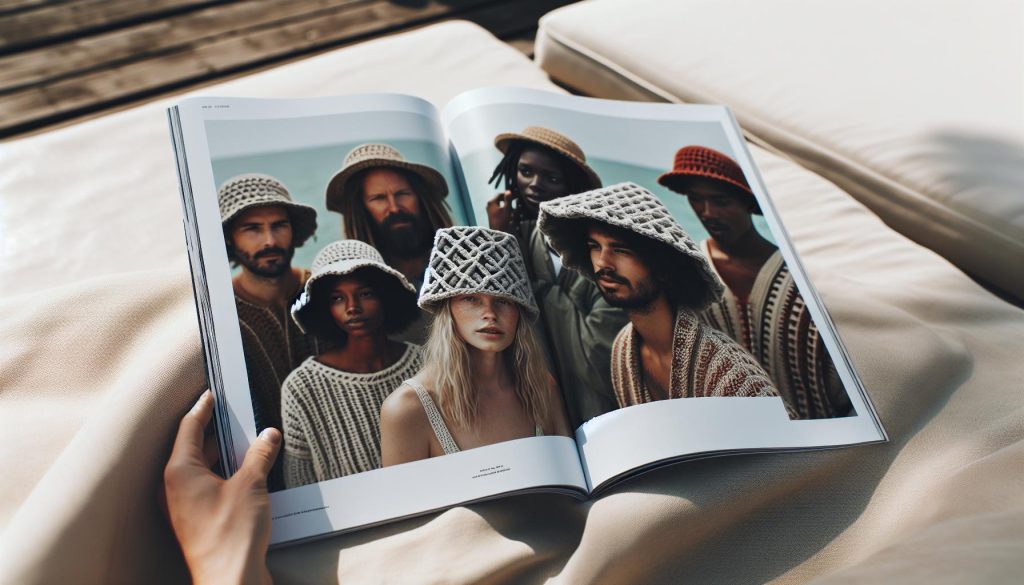
Looking for a stylish accessory that you can proudly say you made yourself? This Square Crochet Hat Pattern offers a delightful fusion of geometric design and modern flair, making it a must-try for crafters of all levels. With its simple yet striking square motifs, you can bring a fresh twist to your wardrobe while honing your crochet skills. Whether you’re a beginner looking to boost your confidence in crochet or a seasoned maker wanting to create something new, this pattern is approachable and fun. Plus, the satisfaction of finishing a project that is both functional and fashionable is unbeatable! So grab your yarn and hook, and let’s embark on this creative journey together-because you absolutely can do this!
Choosing the Right Yarn and Tools for Your Square Crochet Hat
When it comes to crafting a stylish and reflective square crochet hat, choosing the right yarn and tools can make all the difference. The world of yarn is expansive, filled with options ranging from luxurious merino wool to soft cotton blends, each bringing a unique texture and warmth to your project. A general rule of thumb is to opt for worsted weight yarn (labeled as Weight 4), as it provides a balance between structure and flexibility, making it perfect for shaping those geometric designs without overwhelming complexity.
In terms of tools, the right crochet hook is essential. For worsted weight yarn, a size H (5.0 mm) or I (5.5 mm) hook often works best. This size allows for a neat stitch definition, ensuring your patterns pop. Don’t forget to gather other supplies like stitch markers, measuring tape, and a yarn needle for finishing touches-these little tools can elevate your crafting experience from tedious to seamless. Always keep in mind that your crochet experience is uniquely yours, so don’t hesitate to explore different hook materials-metal hooks glide effortlessly, while bamboo hooks provide a more tactile grip.
Tips for Selecting Yarn:
- Fiber Content: Choose based on climate and comfort. Wool is warm but can be itchy for some; cotton is breathable and great for warmer weather.
- Color Palette: Consider how colors will interact in your geometric pattern. Solid colors showcase intricate stitch work, while variegated yarn adds a fun twist.
- Yarn Weight: Ensure consistency; uneven weights can lead to a lopsided finished product. Test swatches can help gauge how various yarns behave together.
The joy of crochet lies not only in the final product but also in the journey you take to create it. Embrace experimentation, mix yarns, and see how they transform your work. Remember, there’s no single “right” way to craft your square crochet hat-what matters is that it reflects your unique style and creativity. So, gather your materials, set aside a cozy crafting spot, and let the magic of crochet envelop you. You can absolutely do this!
Beginner’s Guide to Basic Stitches Used in Square Hats
To create a square crochet hat, mastering a few basic stitches is essential. These stitches are the building blocks of your hat and will empower you to craft a variety of geometric patterns, adding a modern flair to your project. Not only will you find that these stitches are foundational, but they also open the door to endless creativity, allowing you to customize your design as you grow in skill and confidence.
The most common stitches used in square hats are the chain stitch, single crochet, half double crochet, and double crochet. Each stitch varies in height and texture, making them perfect for creating the distinct shapes and patterns that characterize a geometric style. Here’s a quick overview of these stitches:
Key Stitches for Square Hats
- Chain Stitch (ch): This is the very first stitch you’ll learn. It’s simple to execute and creates the foundation chain for your hat. To make a chain stitch, simply yarn over and pull through the loop on your hook.
- Single Crochet (sc): A fundamental stitch that results in a tight, sturdy fabric. To work this stitch, insert your hook into the next stitch, yarn over, pull through, yarn over again, and pull through both loops on your hook.
- Half Double Crochet (hdc): Slightly taller than single crochet, this stitch provides a nice texture while maintaining some density. Yarn over, insert your hook, pull through, yarn over again, and pull through all three loops on your hook.
- Double Crochet (dc): This stitch creates a taller and more open fabric, allowing for more visual space in your geometric patterns. Yarn over, insert your hook, pull through, yarn over and pull through the first two loops, then yarn over and pull through the last two loops.
Once you’re comfortable with these basic stitches, combining them allows for various techniques like increases and decreases, which are crucial for shaping your square hat. For example, using double crochet for wider sections gives an airy look, while alternating with single crochet can create striking lines.
In practice, a typical square hat might begin with a chain of 40 stitches, followed by rows of alternating single crochet and half double crochet to establish your base. As you progress, you can incorporate more intricate designs using color changes and patterns, playing with the geometry to suit your style. Don’t forget, the best part of crocheting is that it’s all about experimentation and enjoyment-you can absolutely do this! So grab your yarn and hook, and get ready to create a delightful accessory that’s uniquely yours.
Step-by-Step Instructions for Creating a Square Crochet Hat
To embark on the delightful journey of creating a square crochet hat, let’s break it down into manageable steps. This project is perfect for all skill levels, whether you’re just starting or looking to enhance your crochet skills. With just a few basic materials and a bit of your creative spirit, you can craft a stylish geometric hat that showcases your individuality.
First, gather your materials: you’ll need your favorite yarn-go for something soft and warm, like a worsted-weight cotton or acrylic blend-and an appropriately sized crochet hook (typically a size H-8/5mm works well). Don’t forget a pair of scissors and a yarn needle for weaving in those ends!
Now you’re ready to start. Follow these steps:
- Create a Foundation Chain: Begin by making a slip knot and chaining 40 stitches (or adjust this number based on your desired size). This chain will serve as the base of your hat.
- Establish Rows: In the second chain from your hook, start your first row with single crochet (sc). Continue single crocheting across the chain. Once at the end of the row, turn your work.
- Build the Body: For the next row, switch to half double crochet (hdc). This will add a lovely texture. Continue alternating between single crochet and half double crochet in subsequent rows, ensuring your hat grows to your desired length.
- Shape the Hat: Once the main part of the hat reaches about 8-9 inches in length (or your desired height), it’s time to start shaping the top. Begin decreasing by skipping stitches on alternate rows-this means for every row, crochet until the last few stitches, where you can join pairs together to create a gentle taper at the top.
- Finish Off: Once you’ve reached the top of your hat, cut the yarn, leaving a long tail. Use this tail to weave through the remaining stitches, pulling tight to close the top of the hat. Weave in any loose ends with your yarn needle.
- Add a Unique Edge (Optional): To elevate your design, consider adding a decorative edge using a contrasting color or a different stitch, like a shell stitch or picot edge, to give your hat a polished look.
Creating a square crochet hat not only allows you to express your creativity but also helps you develop your crochet skills. Don’t hesitate to experiment with different yarns, stitches, and colors! Remember, the key is to enjoy the process-you can do this! So grab your yarn, get cozy, and let your creativity flow into a beautiful, handmade hat that’s sure to be a conversation starter.
Design Variations: Playing with Color and Patterns
When crafting your square crochet hat, the beauty lies not just in the stitches but in the colors and patterns you choose. Playing with color can transform a simple design into a stunning piece that reflects your personal style. Imagine the joy of wearing a hat that showcases your creativity and design sense! Fortunately, there are numerous ways to incorporate vibrant hues and interesting patterns into your project.
One effective approach is to use the granny square technique. By joining together multiple small squares in different colors, you can create a unique, patchwork look. Consider alternating between solid colors and variegated yarns for an eye-catching contrast. Another fun variation is the stripes method. Selecting a color palette-perhaps using three to five coordinating shades-can add depth while keeping it visually exciting. Simply switch colors every few rows to achieve a dynamic striped pattern that catches the eye.
- Ombre Effect: Gradually transition colors from light to dark or create a sunset effect with blended shades. This technique adds sophisticated flair to your hat.
- Polka Dots: Use a contrasting color to create small dots or shapes scattered across your design. This playful detail can bring a cheerful vibe to your crochet project.
- Geometric Patterns: Incorporating shapes like triangles or diamonds can add structure to your hat. Simply change stitches or colors at strategic points to form these designs.
Don’t hesitate to experiment! The only limit is your imagination. If you’re feeling adventurous, try combining various designs. For example, pair stripes with polka dots or use solid squares with an ombre border. Each combination offers a distinctive look, ensuring your square hat is truly one-of-a-kind. Remember, making mistakes is part of the joy of crafting-embrace the process and enjoy the ride. Whether you’re a beginner or a seasoned crocheter, you can do this. So grab those vibrant yarns and let your creativity shine!
Tips for Crafting a Perfect Fit for Your Hat
Crafting a square crochet hat that fits just right is an exciting part of the process that can make all the difference in your finished piece. A well-fitted hat not only looks great but also feels comfortable to wear. Here are some handy tips to help you achieve the perfect fit for your geometric modern-style crochet hat.
Start by measuring the head size of the intended wearer. Use a flexible measuring tape to determine the circumference around the widest part of the head, typically just above the ears and eyebrows. This measurement will guide you in determining how many squares to crochet. If you’re unsure, it’s a good idea to make a swatch using your chosen stitch pattern. Typically, a child’s hat might measure around 20 inches, while adult sizes can range from 21 to 23 inches.
As you begin to create your squares, consider the stretch and drape of your yarn. Some yarns have natural elasticity, while others may be more rigid. You want your squares to be big enough to fit comfortably, but not so loose that they sag. A good rule of thumb is to create squares that measure about 6-8 inches per side. If you find your squares are larger than needed, simply adjust your hook size or tension to make them smaller.
Adding Adjustability
For added versatility in size, incorporate a brim or band that can be adjusted. This is easily achieved by adding rows of single crochet or a ribbed pattern at the base of the hat. This technique not only helps in making the hat snugger but also adds an attractive design element. You can even use a simple drawstring method with a contrasting yarn in the band, giving the wearer the option to tighten the fit as needed.
Testing the Fit
Don’t hesitate to try the hat on during the creation process! Once you’ve stitched a few squares together, put it on to see how it’s shaping up. This will give you immediate feedback on whether it fits well and how it feels. If adjustments are needed, such as adding or removing rows or squares, it’s much easier to do this sooner rather than later. Embrace the iterative nature of crochet; each project brings you closer to mastering that perfect fit.
With these tips, you’re well-equipped to tackle your square crochet hat confidently. Remember, every crafter’s journey is unique, and experimentation is a key part of the creative process. Dive in, enjoy the art of crochet, and celebrate your progress with each stitch! You can do this!
How to Customize Your Square Hat with Unique Edges
Adding unique edges to your square crochet hat can elevate its style and give it a personal touch that reflects your creative spirit. The edges not only enhance the overall aesthetic but also allow you to express your personality through colors and textures. Whether you prefer a classic look or something more modern and playful, countless options are available to suit your vision.
To start, consider the type of edge that will best complement your design. Here are a few popular choices:
- Picot Edge: This playful edge adds a touch of whimsy. Create it by working a series of chain stitches followed by slip stitches into the last row of your hat.
- Scalloped Edge: Perfect for a vintage feel, a scalloped edge can be achieved through a combination of double crochets, chains, and slip stitches.
- Ribbed Edge: For a snugger fit, a ribbed edge can be formed using front post double crochets. This not only looks great but also adds elasticity.
- Fringed Edge: If you want something bold, try adding fringe to the bottom of your hat. This technique is as simple as cutting yarn lengths and tying them onto the edge.
Once you’ve chosen your edge style, gather your materials. You’ll typically need the yarn you used for your hat, your crochet hook, and perhaps a smaller hook if the chosen edge is tighter. Depending on the edge, you might want to incorporate a contrasting color to create a striking visual effect.
Remember, as you work on the edge, it’s okay to try it on as you go! This way, you can see how the edge alters the fit and overall look. And if you’re unsure about a technique, don’t hesitate to look up tutorials or videos online-there’s a whole community of crocheters ready to share their tips and cheer you on.
No matter your experience level, customizing your hat edges is a fantastic way to make your project uniquely yours. Enjoy the process, experiment with colors and styles, and most importantly, have fun with your crochet journey. You can do this!
Incorporating Geometric Designs into Your Hat Projects
Creating a square crochet hat with geometric designs is a fantastic way to infuse modern style into your projects. These patterns are not only visually striking but also give you an opportunity to explore your creativity. You might be surprised at how simple it is to incorporate geometric shapes into your crocheting – so let’s dive into some practical tips to get started!
To begin, select a base color for your hat. This will serve as the foundation for your geometric patterns. Once you have your base, consider using contrasting colors for the geometric shapes. Popular choices include triangles, squares, or lines that can create a bold statement. For instance, imagine a hat where the main body is a solid color, but the top features vibrant triangles that form a fun, eye-catching motif. You can create these shapes through color changes in basic stitches, making it accessible even for beginners.
Steps to Incorporate Geometric Designs
- Choose Your Shapes: Decide on the geometric designs you want to use. This can be anything from simple stripes to more complex diamonds or chevrons.
- Color Planning: Sketch out how you envision your design. A simple diagram can guide your color placement and stitch counts.
- Switching Colors: When you’re ready to incorporate a new color for your shape, make sure to practice the color change technique. This involves completing the last stitch of the old color with the new one to create a seamless blend.
- Experiment and Adjust: Don’t be afraid to try different combinations! If a color or shape doesn’t look right, unravel and try a different variation.
As you work, keep in mind that geometric designs can also be enhanced with texture. Using raised stitches like puff stitches or post stitches can add dimension to your shapes, making them pop out even more from the hat. Another fun detail is to mix stitch types within your geometric shapes. For example, alternate between half double crochets and double crochets to create interesting visual effects.
The beauty of incorporating geometric designs is that it allows for endless creativity while you gain confidence in your crochet skills. Remember, this is your creation, and there are no wrong ways to make it! If you feel hesitant about a certain design, trust your instincts – you can do this! Embrace the joy of making something unique, wear the hat with pride, and share your creations with the crafting community. Happy crocheting!
Common Mistakes to Avoid When Crocheting Hats
Crocheting hats can be a delightful and satisfying experience, especially when you’re exploring the geometric designs of square crochet hats. However, a few common pitfalls can turn excitement into frustration. Recognizing these missteps and learning how to avoid them will make your crochet journey much smoother and more enjoyable. So let’s explore some typical mistakes that can happen along the way!
One of the most frequent issues is forgetting to check your tension. If your stitches are too tight, your hat may end up being too small, while too loose stitches can lead to an oversized hat. To ensure a perfect fit, it’s wise to create a gauge swatch before starting your project. This small sample allows you to determine if your tension matches the pattern’s requirements. If not, you can adjust your hook size accordingly. Remember, taking a few extra minutes for this step can save you a lot of time later!
Another common error is neglecting to count stitches consistently. When working on geometric designs, precise stitch counts are essential to maintain your intended shapes and alignments. Losing track of where you are can lead to uneven edges or distorted patterns. It’s helpful to pause periodically, especially after completing a round, to recount your stitches. Keeping a stitch marker handy can also help you easily track your progress and remind you of your starting point.
Additionally, many beginner crocheters rush through their projects without properly planning color changes and transitions. When working with geometric designs, it’s crucial to consider how each color will flow into the next. Practice the color switching technique to ensure smooth transitions that enhance your design rather than disrupt it. If you’re unsure about your colors, laying them out beforehand can provide visual guidance and help you avoid any awkward contrasts in the final product.
Finally, don’t be afraid to unravel and make adjustments. If something doesn’t look right, it’s okay to backtrack. The beauty of crochet lies in its versatility; every mistake offers a chance to learn and improve. You’ve got this! Embrace the process of trial and error, and celebrate the creativity that comes with making your own unique geometric square crochet hats. Happy crafting!
How to Care for and Maintain Your Crochet Hat
Caring for your crochet hat not only preserves its beauty but also extends its lifespan, allowing you to enjoy wearing it season after season. When you put your heart and soul into crafting your square crochet hat, it’s understandable that you want to keep it looking fabulous. A few simple maintenance tips can go a long way in ensuring your hat stays in pristine condition.
To start off, always check the fiber content of your yarn. Different fibers have varying care needs. Acrylic yarn, for instance, is usually machine washable, while wool often requires gentle handwashing to prevent shrinking or felting. Here’s how to care for your hat based on yarn type:
- Acrylic: Can be machine washed in cold water. Lay flat to dry to maintain shape.
- Wool: Hand wash gently in lukewarm water with a wool-friendly detergent. Rinse and lay flat to dry.
- Cotton: Machine washable, but air drying is best to prevent any shrinkage.
Storing Your Crochet Hat
When it comes to storing your hat, avoid cramming it into tight spaces. Instead, consider using a dedicated hat box or simply place it on a shelf where it can breathe. If you’re using a decorative box, add a bit of tissue paper to help maintain its shape. For added protection, consider wrapping your hat in a breathable fabric. Avoid plastic bags, as they can trap humidity and lead to mold or mildew.
Dealing with Pilling and Damage
Pilling can happen, especially if your hat sees a lot of action! Simply use a fabric shaver or a pair of scissors to carefully trim away any pills. If your hat gets snagged, don’t panic-gently pull the yarn back through the hole if possible; or use the crochet hook to fix it while being cautious not to stretch the fabric.
By following these care tips, you’ll not only keep your square crochet hat looking sharp but also infuse it with the love and effort you originally put into creating it. Remember, the joy of crafting isn’t just in the making-it’s also in cherishing and maintaining your creations. You’ve got this! Happy crocheting!
Inspiration: Showcasing Your Finished Square Hats
Embracing creativity in your crochet projects is like opening a door to endless possibilities. Once you’ve crafted your square crochet hat, showcasing it not only celebrates your hard work but also inspires others in the crafting community. Sharing your completed creations, whether through social media, blogs, or local craft meetups, fosters a sense of belonging and gives you a chance to connect with fellow makers who appreciate your artistry.
When it comes to displaying your finished hat, consider taking some captivating photos that highlight its geometric patterns and textures. Use natural light to bring out the vibrant colors of your yarn and the details of your stitch work. You can feature your hat against a rustic background or include props that fit the season or occasion, such as autumn leaves or cozy scarves. Don’t be afraid to get creative with your photography-different angles and settings can showcase your design in unique ways. Remember that every hat tells a story, so share what inspired you and the journey you took to bring your vision to life.
Another fantastic way to showcase your work is by participating in local craft fairs or community events. Setting up a small booth to display not only your hats but also other projects can attract attention and spark conversations. This allows you to engage with fellow crafters and share insights about techniques and patterns. Pair your display with a few printed patterns or mini tutorials to encourage others to try their hand at crocheting. Seeing your creations in person can inspire others to dive into crochet, fostering a supportive community where ideas and techniques are exchanged freely.
Most importantly, remember to celebrate your own accomplishments! Each square hat you create is a testament to your growing skills and creativity. Whether you’re wearing it yourself, gifting it to a friend, or showcasing it online, take pride in your work. The crafting journey is as meaningful as the finished product, so enjoy every moment and keep sharing your passion with the world. You’ve got this, and your creativity deserves to shine!
Sharing Your Crochet Journey: Community and Resources
Connecting with a vibrant community of fellow crocheters can elevate your crafting experience and inspire your creativity. Whether you’re a total beginner just discovering the joy of crocheting square hats or an experienced maker perfecting your techniques, engaging with others can enhance your skills and fuel your passion. The crochet world is filled with resources, online platforms, and local groups that offer support, tutorials, and encouragement. Embrace this opportunity to share your creations, seek advice, and celebrate your achievements.
Joining online platforms such as Instagram, Facebook groups, or dedicated crochet forums can be an amazing way to connect. Consider sharing photos of your finished square hats, tagging relevant hashtags like #crochethat or #geometriccrochet, to get noticed by a broader audience. This not only showcases your work but also allows you to discover others’ projects for inspiration. Participating in challenges or crochet-alongs can also be a fun way to learn new skills and meet fellow crafting enthusiasts.
Local craft meetups or workshops can be equally rewarding. Search for nearby groups through platforms like Meetup or local community centers. Engaging with other crafters in person offers a chance to share experiences face-to-face, exchange tips, and even collaborate on projects. Many crocheters find joy in teaching others, so don’t hesitate to offer your knowledge on square hat patterns or unique stitch techniques. Being part of a creative community helps foster an encouraging environment where everyone grows together, and every success is celebrated, no matter how big or small.
Lastly, make use of online resources for tutorials and free patterns. Websites like AllFreeCrochet and Creative Crochet Corner provide excellent support with detailed instructions and diverse patterns that can challenge your skills while keeping the crafting process fun and enjoyable. Remember, every stitch you make contributes to your journey, and sharing that journey not only enriches your experience but strengthens the fabric of the crochet community. You’ve got the support you need to explore your creativity, so dive in and let your square crochet hats shine!
Faq
Q: What is the best yarn for a square crochet hat with a geometric modern style?
A: The best yarn for a square crochet hat is a medium-weight (worsted) acrylic or cotton yarn, as it provides warmth and structure. Look for yarns with vibrant color options to enhance your geometric designs. You can find recommendations in the Choosing the Right Yarn and Tools for Your Square Crochet Hat section.
Q: How can I adjust the size of my square crochet hat?
A: To adjust the size, increase or decrease the number of squares you crochet, or use a different hook size for a looser or tighter stitch. Always check your gauge and incorporate additional rows or rounds to ensure a perfect fit. For more tips, refer to Tips for Crafting a Perfect Fit for Your Hat.
Q: What stitches are essential for making a square crochet hat?
A: Essential stitches include single crochet, double crochet, and slip stitch. These stitches create the foundation and texture for your hat. Beginners can find guidance in the Beginner’s Guide to Basic Stitches Used in Square Hats section.
Q: How do I incorporate geometric patterns into my square crochet hat?
A: You can incorporate geometric patterns by alternating colors or using specific stitch techniques like crossed stitches or popcorns. Experiment with different color combinations to create unique visuals, as detailed in the Incorporating Geometric Designs into Your Hat Projects section.
Q: What are some design variations for a unique square crochet hat?
A: Design variations include mixing yarn textures, using contrasting colors, and adding embellishments like pom-poms or buttons. These changes can personalize your hat, so explore Design Variations: Playing with Color and Patterns for more inspiration.
Q: How do I care for my square crochet hat?
A: Care for your hat by hand-washing it in cold water and laying it flat to dry. Avoid wringing out the fabric to maintain shape and avoid stretching. For maintenance tips, visit How to Care for and Maintain Your Crochet Hat.
Q: Can I crochet a square hat for beginners?
A: Absolutely! A square crochet hat is an excellent project for beginners due to its simple patterns and straightforward construction. Follow the step-by-step instructions outlined in the Step-by-Step Instructions for Creating a Square Crochet Hat.
Q: What mistakes should I avoid when crocheting a square hat?
A: Common mistakes include not checking your gauge, crocheting too tightly, or miscounting stitches. To prevent these issues, regularly count your stitches and match your tension to the recommended gauge. Further insights can be found in the Common Mistakes to Avoid When Crocheting Hats section.
Concluding Remarks
Now that you’ve crafted your own Square Crochet Hat, we hope you’re feeling inspired and ready for more! This geometric modern style not only showcases your crochet skills but also allows you to express your creativity. If you enjoyed this pattern, why not explore more of our easy crochet tutorials for unique projects like hats, scarves, and amigurumi? You can find a treasure trove of inspiration in our collection of over 700 free crochet patterns here and detailed crochet tutorials here.
Remember, every stitch you create builds your crafting confidence. Feel free to leave a comment below sharing your experience or any questions you have-we love hearing from our crafting community! Don’t forget to sign up for our newsletter to receive the latest patterns and tips directly in your inbox. Your next favorite project is just a click away, so let’s keep the creativity flowing! Happy crocheting!


